
This is a step by step guide on how to integrate SAP Cloud for Customer (C4C) with your central analytics solution (SAP BW/BI).
SAP Cloud for Customer allows to expose analytical data to central analytics solution like SAP BW / SAP BI via ODP or analytical OData. While the OData API allows to directly access report data (including attribute selection and filtering) the ODP interface is used to integrate the C4C data sources. This means that ODP can be used to create a representation of the C4C data source in your central analytics and use this as a basis to create advanced data models and reports. This SDN blog will provide you a step by step guide on how to integrate your C4C tenant with your central analytics solution.
This Blog follows the instructions which can be found in the Business Analytics Guide and will include the configuration steps which have to be executed in two different systems based on preconfigured communication scenarios. https://help.sap.com/viewer/66e9a9081a7b40e38c8604d6617d0311/1811/en-US/5afa143c158644b5bda0821339d3…
The Blog is split into three parts:
-
- Technical Connectivity (this blog)
Technical Connectivity
Prerequisites
The following prerequisites have to be fulfilled so that you are able to connect your C4C tenant to your SAP BI system:
-
- Relevant SAP Netweaver BW license
-
- SAP Business Warehouse 7.30, SP8 or SAP Business Warehouse 7.40
-
- Authorization to use common BW transactions, such as RSA1 and STRUST
As dependencies exist between the different integration activities described in the steps below it is important that you respect the sequence of the different procedures.
Preparing the Source System (SAP Cloud for Customer)
Check solution scope
In a first step it is required to check if the Integration with Central Analytics business option is scoped for your solution. To do so check the following settings:
-
- Open the Business Configuration work center, choose your Implementation Project and Edit Project Scope.
-
- In the newly opened guided procedure navigate to the Scoping section and verify if the Communication and Information Exchange > Integration with External Application and Solutions > Integration with Central Analytics scoping question is selected. If not add it to your scope by selecting the checkbox.

- In the newly opened guided procedure navigate to the Scoping section and verify if the Communication and Information Exchange > Integration with External Application and Solutions > Integration with Central Analytics scoping question is selected. If not add it to your scope by selecting the checkbox.
-
- On the Questions screen make sure that the Communication and Information Exchange > Integration with External Applications and Solutions > Integration with Central Analytics > Do you want to make analytics data from the SAP NetWeaver Business Warehouse system available to your solution scoping question is selected.

- On the Questions screen make sure that the Communication and Information Exchange > Integration with External Applications and Solutions > Integration with Central Analytics > Do you want to make analytics data from the SAP NetWeaver Business Warehouse system available to your solution scoping question is selected.
-
- After you have reviewed and confirmed your entries, choose Finish
Create a communication system and communication arrangement
After your tenant’s functionality to integrate with your central analytics solution was activated, in a next step you have to setup the communication channel for data replication.
To do so you have to create a Communication System first and afterwards the corresponding Communication Arrangement. Both settings can be found in the workcenter Administration > General Settings > Integration.

The new Communication System has to be created with the following mandatory settings:
-
- ID – Will be used as a template for the technical user in the communication arrangement
-
- Host Name – Is not mandatory but it makes sense to maintain a meaningful description. Beside that it is not used.
-
- System Access Type – Has to be of type Internet

After the initial creation the Communication System is in status In Preparation. Before you can use it for creating the Communication Arrangement you first have to activate it via the Set to Active action.

As soon as the status changes to Active the corresponding Communication Arrangement can be created.
The Communication Arrangement itself is created through a guided activity which is started by clicking on New in the Communication Arrangements view. In the first step you have to select the Communication Scenario Analytics Integration. In the second step Define Business Data you have to choose your previously created Communication System for the System Instance ID.

In the Define Technical Data step you will now define the technical settings for the ODP connection (the communication scenario only consist of a single inbound service as SAP BW always fetches the data from C4C – there is no direct replication initiated from C4C to SAP BW).
For accessing the web service one of two available Authentication Methods can be used (the user ID itself it created automatically, it is based on the Communication System ID and cannot be changed):
| Authentication Method | Settings |
| SSL Client Certificate |
Using the SSL Client Certificate for authentication provides two options. First one is to upload a certificate which was provided by your SAP BW administrator. Therefore go via Edit Credentials, navigate to the Certificate tab and choose Upload Certificate to upload the certificate which was provided to you.
The second option allows you to create and download a PKCS#12 key pair file, in case your SAP BW administrator cannot provide a certificate. The PKCS#12 file will be encrypted by a password provided by you and contains a public key certificate and a private key.
After the generation you can see the certificate information:
|
| User ID and Password |
If this authentication method is used you simply have to specify a password by choosing Edit Credentials and maintaining the password in the Change Password tab.
|


In general I would recommend to use the SSL client certificate because it is more secure compared to the user / password option. But in the end the C4C admin and the SAP BW admin have to agree on the authentication method which should be used. Whereas the user / password option might be a good option for a proof of concept it might be a no-go for productive usage. In any case make sure that the password used is compliant with your company’s security policies.
What is important to keep in mind is that in case you use the SSL client certificate method you always have to keep the validity of the certificate in mind. As soon it expires it has to be update in C4C and SAP BW.
For this example, we will generate our own SSL certificate which we store on the client for later usage. Remember the password as we will need it later on when setting up the SAP BW system. Moreover make sure that the downloaded PKCS#12 key pair file has the right file format (.p12).
Finally Review your settings and Finish the creation. This will generate and activate the communication arrangement in your C4C tenant.
Download the webservice definition (WSDL)
After the Communication Arrangement was activated open the Technical Data by editing the Communication Arrangement.

After you click Edit Advanced Settings technical information for the ODP webservice are displayed and it allows you to Download WSDL.

Download the WSDL and store it together with the Client certificate because you will need it to generate an webservice endpoint in the SOA Manager of the target BW system and establish the connection between the C4C and BW system.
Export the C4C certificate
To successfully establish a secure connection between your SAP BW system and the C4C tenant you need the relevant C4C (root) certificates which you can download for example by using your browser.
Before you can download the certificate you first have to:
-
- Add the C4C URL to your trusted sites (only this allows you to download the certificate in the next step)

- Add the C4C URL to your trusted sites (only this allows you to download the certificate in the next step)
-
- Download the C4C root certificate by
-
- clicking on the lock sign beside the C4C URL in your browser

- clicking on the lock sign beside the C4C URL in your browser
-
- Switch to the Certification Path tab, select the root certificate and click on View Certificate

- Switch to the Certification Path tab, select the root certificate and click on View Certificate
-
- Go to the Details tab and click Copy to File and then click Next

- Go to the Details tab and click Copy to File and then click Next
-
- Choose Base-64 encoded X.509 (.CER) and click Next

- Choose Base-64 encoded X.509 (.CER) and click Next
-
- Provide the location where you want to save the certificate on your local system and click Next. You will see a message that your file was exported successfully.
-
- Repeat the steps a) – e) for the Verizon Public SureServer CA certificate
-
- Download the C4C root certificate by
If either the installation or export of the certificate doesn’t work, you might have to run your browser as an administrator.
Preparing the Target System (SAP BW / SAP BI)
Preparation
Before we continue with the configuration in SAP BW we first make sure that we have all the required artifacts available:
| Generally required | |
|
|
| SSL client certificate authentication | User / Password Authentication |
| PKCS#12 key pair (if your SAP Netweaver BW administrator cannot provide a certificate) | Technical user ID and password |
Moreover we have to assure that the release of the SAP BW system supports .p12 as a Personal Security Environment (PSE) file type. If this is not the case go ahead by downloading and configuring the SAPGENPSE cryptography tool.
Setup a trust relationship between your SAP BW and C4C tenant
The steps for setting up the trust relationship between the SAP BW system and your C4C system depend on the authentication method you have selected.
User ID and Password
For the User ID / Password scenario you have to upload the Global Root Certificate (Baltimore CyberTrust Root) to enable a successful SSL handshake between the C4C tenant and the SAP BW system).
To do so open the SSL client Anonymous PSE (SSLC/ANONYM) in your systems Trust Manager (transaction STRUST) and import the certificate:

Select the root certificate which you have downloaded previously and add it to the Certificate List and save your changes:
SSL client certificate
If you have received an SSL certificate from your SAP BW admin you have to assure that the Global Root (Baltimore) and the intermediate certificate (Verizon Public) of the C4C tenant are added to the SSL client Standard PSE (SSLC/DFAULT):

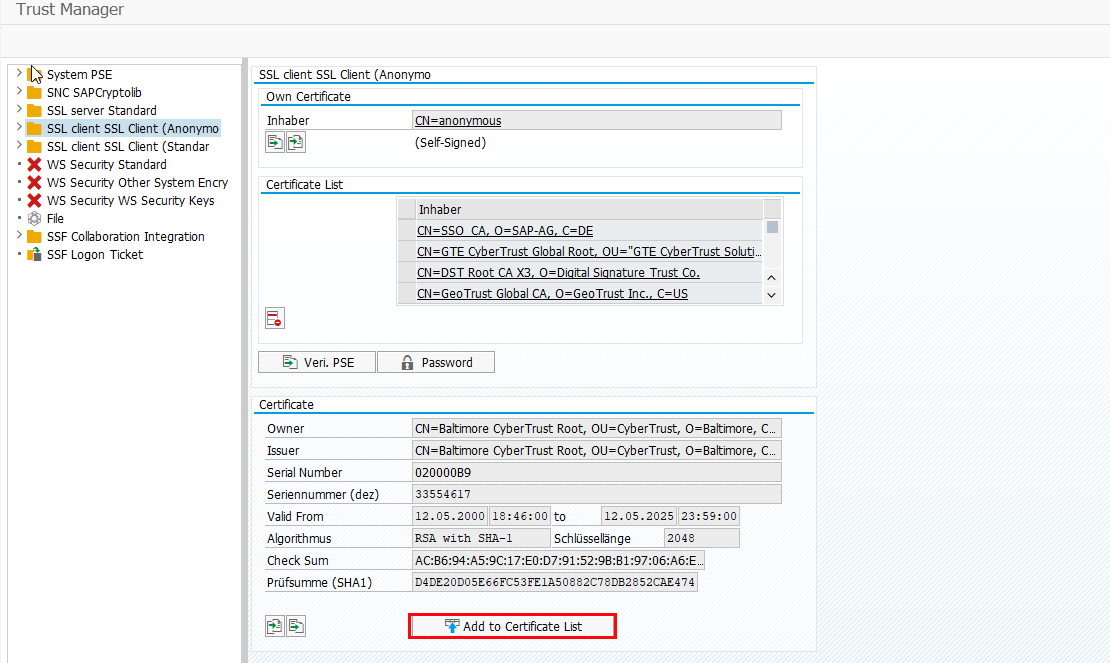
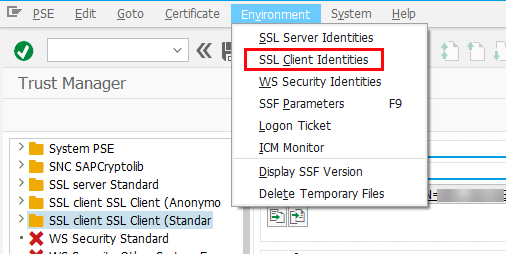
In case you have chosen the PKCS#12 method you have to import the key pair file. Either the key pair file is uploaded to an existing PSE (e.g. the SSLC/DFAULT) or you create a new one by navigating via Environment > SSL Client Identity:
Here you can add a new entry which you want to use:

For importing the key pair file go via PSE > Import and open the key pair file from your disc:

You will have to provide the password which was used to create the key pair to successfully import the p12-file. After the import go via PSE > Save as… and select the corresponding SSL Client PSE:
 |
 |
As a result the key pair file certificate should be displayed in the Own Certificates pane.
Activate the service for application SOAP management
To enable the functionality that ODP can be configured in SOA Manager we have to ensure that the corresponding Web Service for SOA Manager is up and running. This can be achieved by checking the service APPL_SOAP_MANAGEMENT in the Internet Communication Framework (transaction SICF).

Inactive services are displayed in gray (like the app_migrate service) and active services are displayed in black (like the APPL_SOAP_MANAGEMENT).
If the APPL_SOAP_MANAGEMENT service shouldn’t be active you can activate it by right clicking on the service and selecting the Activate Service option. More information about activating / deactivating services can be found in the ICF documentation.
Configure the ODP connection between SAP BW and C4C
Enable ODP as source system in SAP BW
In case your SAP BW system was never integrated via ODP yet it might be that ODP does not appear as a source system in transaction RSA1.

If it does not appear follow the steps below to activate it:
-
- Run report SAP_RSADMIN_MAINTAIN in transaction SE38
-
- Add the Object ODP with Value X and execute the report

- Add the Object ODP with Value X and execute the report
After the activation ODP should appear as additional option for your source system type.
Add your C4C tenant as ODP source system
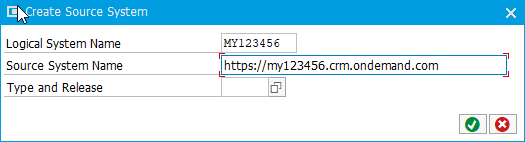
In transaction RSA1 create a new ODP source system by navigating to the Source Systems in the Modeling area and right clicking on the ODP folder on the right and select Create…

In the following dialog first specify the technical name for the source system in the Logical System Name field and a suitable description in the Source System Name field and confirm your details by clicking the continue icon.
After you have specified the basic information the Select Communication Channel screen shows up where you have to select the HTTP/SOAP option which will provide you the possibility to open the SOA Manager for creating the logical port.
 |
 |
In SOA Manager a consumer proxy of type CO_RSDSPX_ODP_IN is created for your C4C source system. To make the configuration as smooth as possible we will use the WSDL file for configuring the logical port which we have previously downloaded from the communication arrangement.
To do so simply select the WSDL Based Configuration option.

In the first step make sure that the Logical Port Name matches exactly the Logical System Name of the ODP source system which was created in the Data Warehousing Workbench.

In the second step select the WSDL file from your local file system, hit Next twice until you reach the Consumer Security step (4).

Depending on the authentication method which you have selected you either have to specify the User / Password or select the right SSL Client PSE.
| SSL Client Authentication | User Password Authentication |
 |
 |
In the HTTP settings step (5) you should increase the maximum wait time for WS consumer to 900s as data extraction usually takes some time (0 would mean infinite). This is also the place where you can specify your corporate proxy settings if required so that the connection can be established.

Finally hit Finish to end the configuration wizard.
Before going back to transaction RSA1 we can check the connection by pinging the Web Service:

When the Ping was executed successful you can switch back to transaction RSA1 and Check the Web Service configuration from there as well.

This should result in a success message at the bottom:

Before you can access the analytical content from your C4C tenant it is important to set the right context for the ODP source system. By right clicking on the newly created ODP source system and choosing Select Context… you have to select the BYD_MDAV context.
 |
 |
In case you are already running on SAP Business Warehouse 7.40 the process for creating an ODP source system is slightly different. Details can be found in the documentation, for C4C integration the ODP – SAP Business ByDesign ODP folder has to be selected.