Attribute Sets are used to create groups of attributes in SAP Upscale Commerce that allow you to display information and to collect value entries from consumers using your apps. Attribute Sets provide you with a convenient, no-code way to extend different data models.
For example, attribute sets can be used to:
-
- Personalize orders with gift wrapping or personal messages.
-
- Monogram items.
-
- Perform calculations so that consumers can figure out how many tiles or how much carpet they need to cover a room.
-
- Provide fields where consumers can specify their address, their general brand or color preferences, and so on, as part of their profile.
-
- Provide consumers with forms, such as Contact Us, where they can provide feedback, make inquiries, or ask questions.
-
- Display product attributes in the product detail page, for example, the author and ISBN number of a book.
Today, I’m going to show you how you can extend the Notification resource type to create a “Contact Us” form for the end customers to reach out to the merchants.

Overview:
The general steps for configuring a Contact Us form are:
-
- Create a blank template in “Experiences” and add an “Attribute set” component to it.
-
- Create and configure a new attribute set in “Attribute Sets” under “Content Management”.
-
- Create a new Notification in “Commerce Notifications” under “Advanced Settings”.
-
- Select where do you want to display the new “Contact Us” form in the app.
Let’s dive into the step-by-step process of configuring a Contact Us form.
Step-by-Step instructions:
-
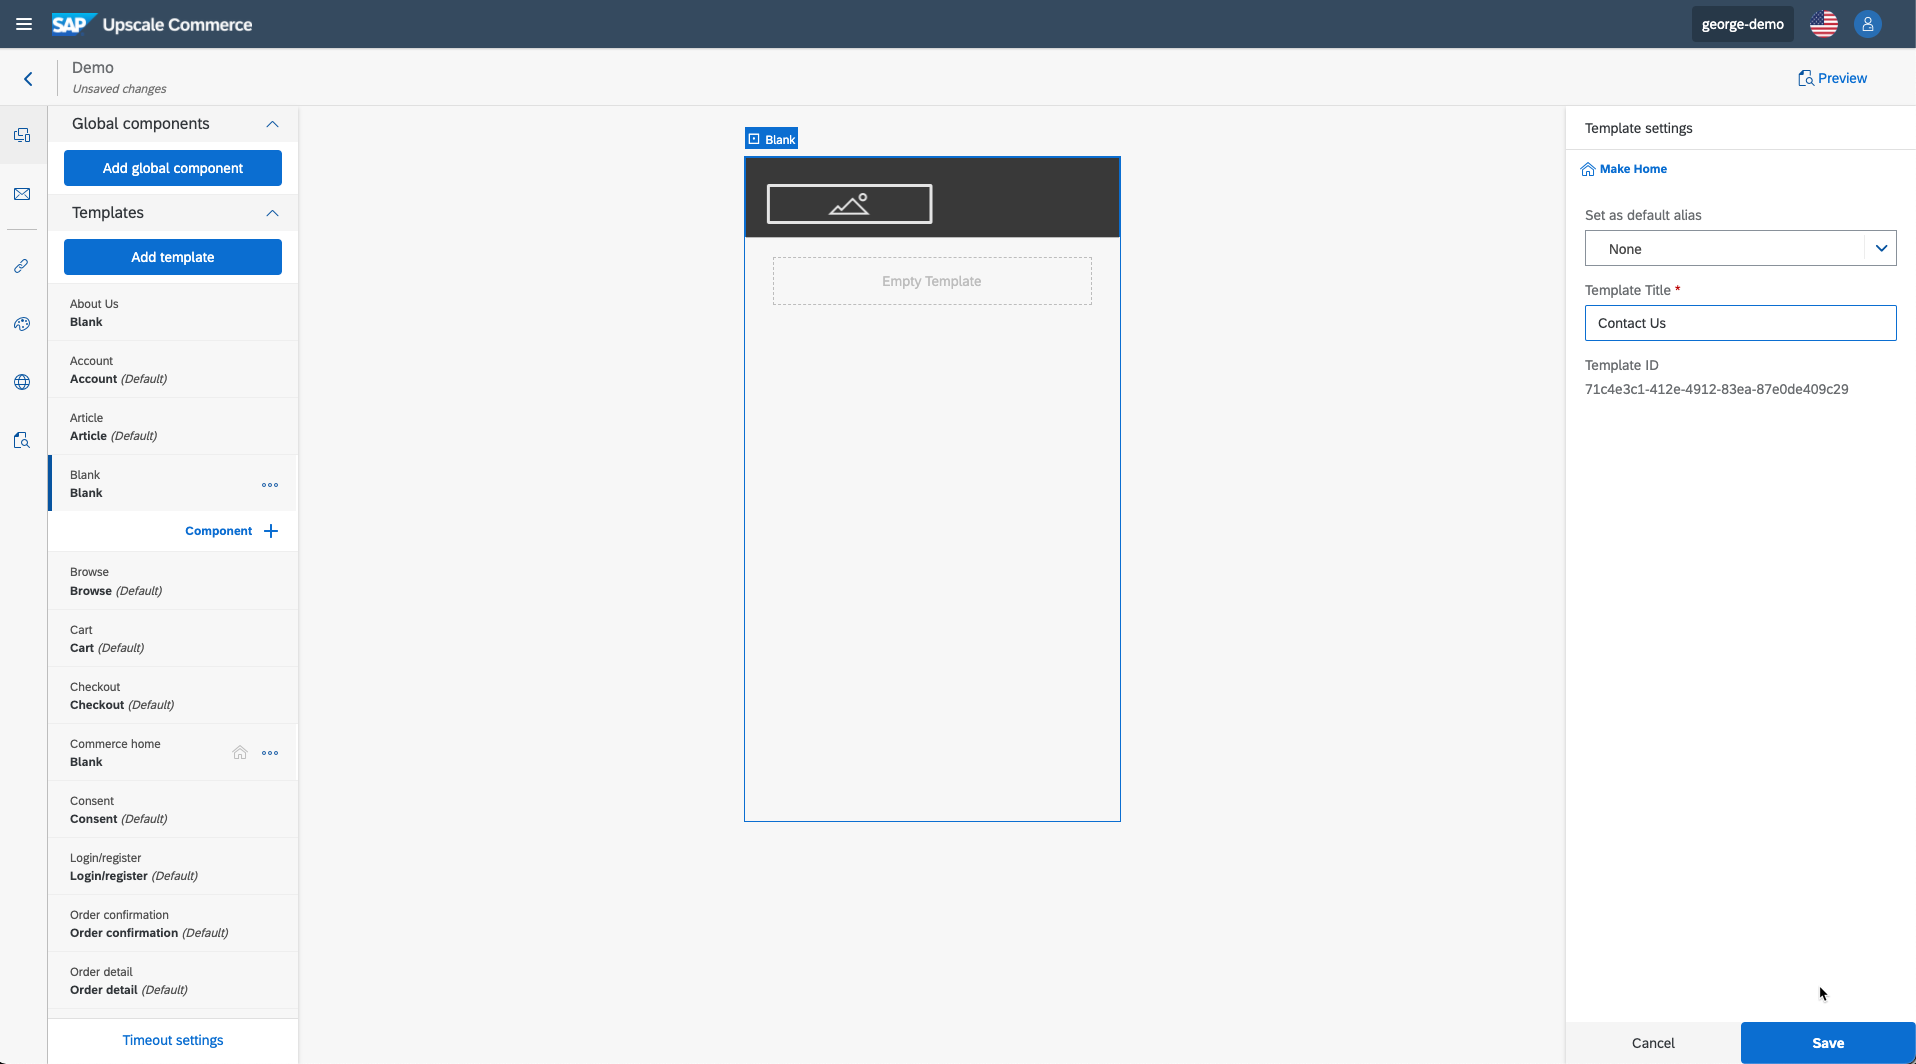
- In the workbench, go to “Experiences” and select the experience that you want the “Contact Us” form to be added to. Click on “Add template” to create a “Blank” template.

-
- Select the new template, click on the three dots beside it, and rename it to “Contact Us”. Click on “Component +” and select “Attribute sets” under the “Extensibility” section and rename it.

-
- Go to “Attribute Sets” under “Content Management” and click on the + sign to create a new attribute set. Give it a name, a description (optional), and select “Notification” Resource Type.

-
- Now, it’s the actual form design. Think about what you want to collect from the consumer. Under “Set definition”, add your attributes, and select their Type. For example, for the “First Name” & “Last Name”, select (Text (String)) as the Type, limit them to 10 characters long, and “Alpha (A-Z)” as the “Text format accepted”. For the “Phone number” attribute, select “Numeric (0-9)”, “Email” for the “Email” Attribute and “Any” for the “Comments” attribute.

-
- After finishing the Set definition, go to “Assignments”, and assign this new Attribute Set to the “Contact Us” component in your experience.

-
- Under “Consumer display”, customize:
-
- The message that the user will get after submitting the form, for example: “Thanks for reaching out, we will get back to you soon”
-
- The Headline of the Attribute set, for example: Contact Us
-
- Under “Consumer display”, customize:
Don’t forget to select when do you want to publish this attribute set. In this example, I want to publish it immediately, so I selected “Publish” and hit “Save”.
-
- To configure the email address where you will receive the “Contact Us” submissions from customers, go to “Commerce Notifications” under “Advanced Settings”, create a new Notification, calling it, for example, “Contact Us Notification”, select your experience, then select “Attribute set Notification” as the “Template Type”. Enter the email address (or a DL) that you want to send the entries to, the subject, and the Body.
Don’t forget to set the status to “Active”.

So far, we have created the Contact Us form, activated it, and configured its notifications. However, the Contact Us form is not shown to the consumer as you don’t display it yet in your app.
There are many places in your storefront where you can display the Contact Us form, for simplicity, let’s display it on the PWA top right. So, go to Experiences, click on the Navigation icon, select “PWA Top right” and add a new Navigation item. Give it a name and select “Contact Us” template and hit “Save”

Now, check your deployed app, you should see “Contact Us” in the top right. Every time a consumer uses it to communicate with your organization, an email is sent to the configured email address with the info entered by the consumer.
Conclusion
After reading this article, you should be familiar with creating a “Contact Us” form using Attribute Sets.
Let me know if you want to know more about Attribute Sets and its use cases, i will be happy to make another post for that.
Documentation links:

