
The blog post describes the way to connect Intelligent Selling Services of an older/outdated version. If you want to learn the new way, please follow this blog post here.
Abstract
Intelligent Selling Services for SAP Commerce Cloud is a cloud-native system that can capture and analyze contextual and behavioural data across customer journey with SAP Commerce Cloud systems, then provides real-time customer experience merchandising and personalization. A brief introduction to Intelligent Selling Services can be found here.
In this blog post, I will walk you through the necessary steps to connect a SAP Commerce Cloud instance to an Intelligent Selling Services (for SAP Commerce Cloud) tenant.
Prerequisite
you should have:
-
- a provisioned Intelligent Selling Services tenant with admin role access.
-
- a SAP Commerce Cloud running instant with a storefront (In this blog post, we use the standard accelerator as an example).
Set up a site
Please log into your provisioned Intelligent Selling Services tenant and navigate to Administration | Site Management. (Please note, Admin role is required to perform this step)

navigate to Site Management
Click on the “Create Site” button to create a new site. Fill in the necessary information according to the requirement.

Create a Site Wizard
Hit Create and the site is now created and being initialized (displayed as “Initializing…”). Wait until the initialization is done and the site’s status displays as “Active” like the other sites (if any). This usually takes 1-2 minutes, you can refresh the page to see the status change.

Site created and being initialized
Connect a SAP Commerce Cloud instance
In the Administration | Site Management workspace, on the row of the created site, click on “SAP Commerce Cloud Configuration”.

ready to configure SAP Commerce Cloud
Now you should be switched over to the SAP Commerce Cloud Configuration workspace, where 4 steps are required for the configuration:

4 steps to configure the SAP Commerce Cloud Connection
Step 1: checking the SAP Commerce Cloud required modules.
You will need 2 modules to be installed on your SAP Commerce Cloud:
-
- the Foundation module: captures all customer interactions and behaviors to create and enrich a continually evolving contextual profile.
-
- the Merchandising module: provides features related to the integration configuration.
There are 2 ways to install the required modules
-
- or manually install the following extensions:
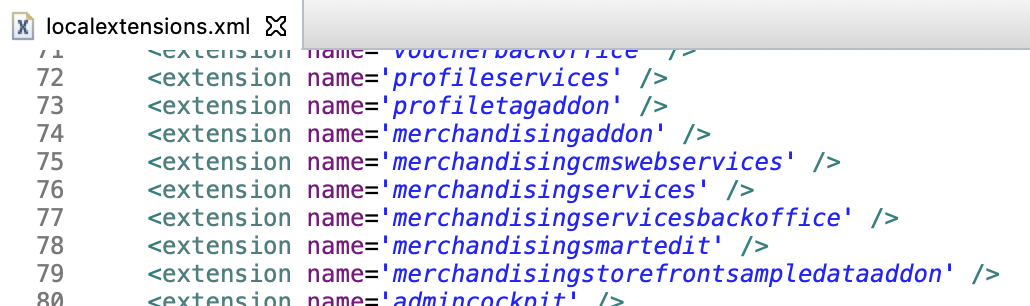 don’t forget to install the 2 listed addons: profiletagaddon and merchandisingaddon to your storefront.
- or manually install the following extensions:
Step 2: Create Integration Client

step 2: create integration client
We’ll navigate to Clients workspace, and click on the Create Client button on the top right, and fill in the necessary information:

Create an Integration Client
-
- ID: unique client identifier without empty space, will be used later for configuration settings.
-
- Name: descriptive name for the integration client.
After clicking on Add, a window is popped up and contains very important information:

Please note down the client ID and Secret
As indicated by the message, please copy the value of the client id and client secret, this will be used as authentication data by SAP Commerce Cloud later in step 4. Especially the secret cannot be accessed again if the window is closed.
After creating the client, navigate back to the SAP Commerce Cloud Configuration workspace and continue with the step 3.
Step 3: Profile Tag configuration
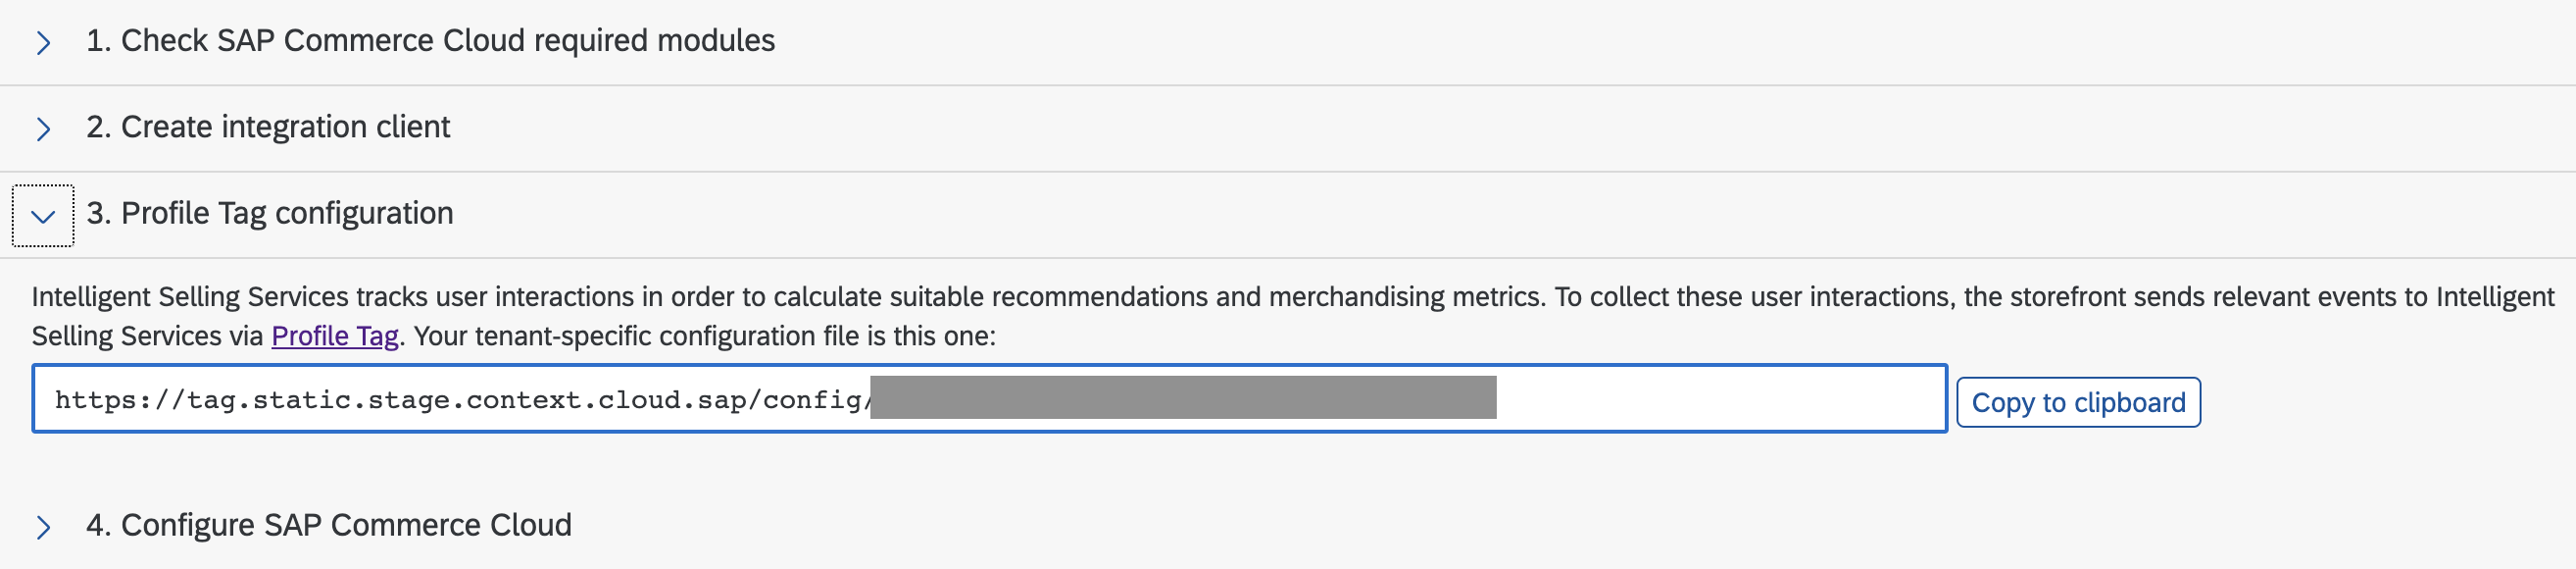
tenant specific profiletag
The profile tag is tenant specific, if you are using accelerator storefront, the value is already included automatically in the ImpEx file in step 4 (we will cover this next).
Please note:
-
- the ImpEx is intended for accelerator-based storefronts.
-
- for Spartacus, the configuration is a bit different and will be described in a different blog post or a microlearning video later.
Step 4: Configure SAP Commerce Cloud

Step 4: Configuration SAP Commerce Cloud
Click the “Click here to expand the ImpEx template” to see an automatically generated ImpEx template. We will need to adjust it to contain the specific values of your Intelligent Selling Services tenant as well as the SAP Commerce Cloud instance.
Within the ImpEx, the parts that need to be adjusted are usually the macro definitions as shown below:

ImpEx Template to be adjusted
where:
-
- $clientid is the exact client id value in step 2
-
- $clientsecret is the exact client secret value in step 2
-
- $region is the server location code of the Intelligent Selling Services tenant, e.g. “eu”, “us”, etc. If you are not sure which region code you should use, take a look at the part <2> of the url of your tenant:
-
 $lang is the language iso code of the content to be fetched from SAP Commerce Cloud and imported into Intelligent Selling Services later, e.g. “en”
-
- $tenant is the Intelligent Selling Services tenant id, is also the part <1> of the url of your tenant (e.g. in above image)
-
- $site is the unique site id when setting up the site in Intelligent Selling Services
-
- $profiletagconfigurl is the automatically included value from step 3, please leave it as is.
-
- $basesite is the site id of your storefront, e.g. “electronics”
-
- $currency is the currency acronym, e.g. “USD”
-
- $solrIndexedType is the id of the solr indexed type, e.g. “electronicsProductType” (default in standard electronics accelerator store)
-
- $productCatalog is the id of the product catalog, e.g. “electronicsProductCatalog”
-
- $contentCatalog is the id of the content catalog, e.g. “electronicsContentCatalog”, for relating to the cms components of the storefront.
-
- $imageUrlPrefix is the prefix of the url pointing to images, i.e. the root/homepage url without the encoded attributes (in standard accelerator storefront):
-
- e.g. https://electronics.abc-public.model-t.cc.commerce.ondemand.com/ (of a commerce cloud instance)
-
- $imageUrlPrefix is the prefix of the url pointing to images, i.e. the root/homepage url without the encoded attributes (in standard accelerator storefront):
-
-
$siteBaseUrl is the root/homepage url without the encoded attributes (in standard accelerator storefront)
-
-
e.g. https://electronics.abc-public.model-t.cc.commerce.ondemand.com/ (of a commerce cloud instance)
-
-
-
-
- $sitePreviewUrl is the root/homepage/url with the encoded attributes (if any), e.g. “$siteBaseUrl/$basesite/en/$currency”
-
- e.g. https://electronics.abc-public.model-t.cc.commerce.ondemand.com/electronics/en (of a commerce cloud instance, please note, here we don’t have currency as an encoded attribute, therefore it’s not needed)
-
- $sitePreviewUrl is the root/homepage/url with the encoded attributes (if any), e.g. “$siteBaseUrl/$basesite/en/$currency”
After adjusting the ImpEx, go to your SAP Commerce cloud instance:
-
- import the adjusted ImpEx, e.g. in hac
-
- synchronize your product catalog and content catalog (the ones you specified in your ImpEx script)
Validate the events being collected
to check whether the connection is established, please follow the steps below:
-
- open the storefront in your browser, grant the Intelligent Selling Services tracking consent:

- open the storefront in your browser, grant the Intelligent Selling Services tracking consent:
-
- open the developer tool of your browser (e.g. in Firefox | Tools | Browser Tools | Web developer Tools), switch to Network tab:

- open the developer tool of your browser (e.g. in Firefox | Tools | Browser Tools | Web developer Tools), switch to Network tab:
-
- perform any action that triggers sending data to Intelligent Selling Services, e.g. click on a product to load the product detail page. Look for the POST request with the file name “clickstreamEvents”, and you should see the 201 created response, i.e. the data is successfully sent to Intelligent Selling Services tenant.

- perform any action that triggers sending data to Intelligent Selling Services, e.g. click on a product to load the product detail page. Look for the POST request with the file name “clickstreamEvents”, and you should see the 201 created response, i.e. the data is successfully sent to Intelligent Selling Services tenant.
Last but not least
The blog post introduces how to connect SAP Commerce Cloud to Intelligent Selling Services, so that data can be sent from your SAP Commerce Cloud storefront to your Intelligent Selling Services tenant.
Further blog posts will be conducted to describe how to use the collected data and configure the various recommendation possibilities on Intelligent Selling Services as well as SAP Commerce Cloud.
If you want to know more?
Please take a look at the portal page of Intelligent Selling Services:
https://help.sap.com/viewer/product/INTELLIGENT_SELLING_SERVICES/
Also pay attention to the up-coming blog post (e.g to follow me on SAP Community) and planned live session on SAP Learning Hub about Intelligent Selling Services for SAP Commerce Cloud.